Montreal-based e.d. films has released PSD to 3D, a new plugin that converts 2D drawings into 3D content.
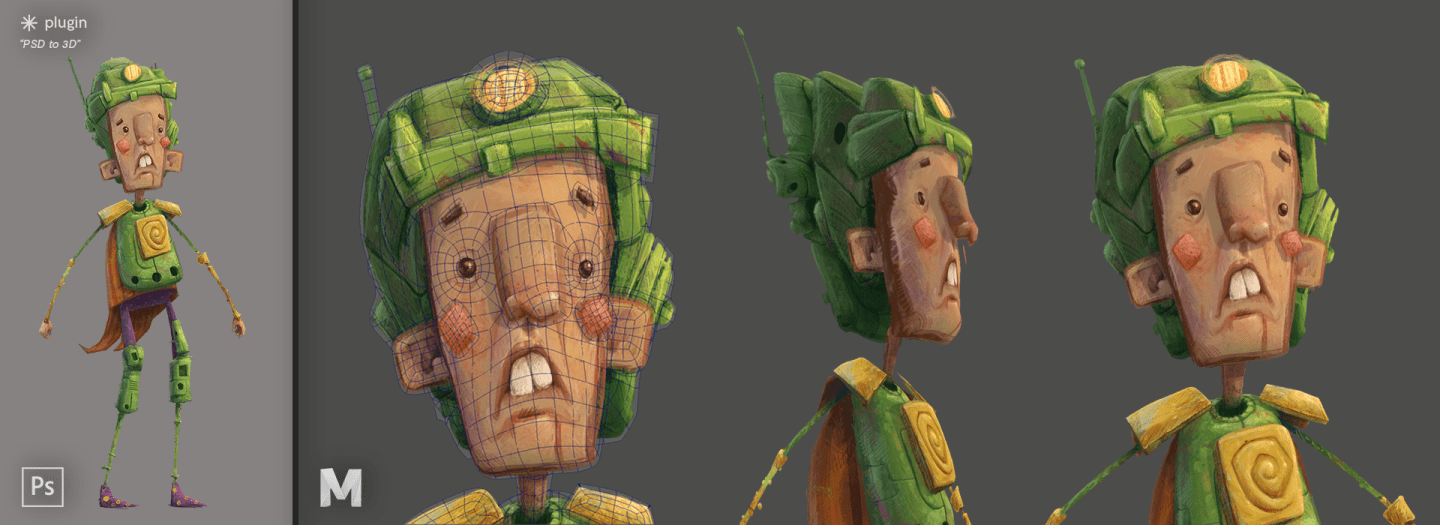
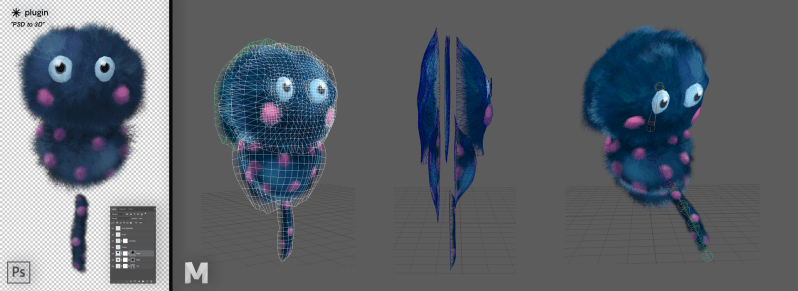
This new converter is production-grade and simple enough that anyone can start converting Photoshop drawings and paintings easily. The 3D objects will then be available within Autodesk Maya for tweaks, including depth and resolution.
PSD to 3D replaces an outdated After Effects method that often requires artists to produce hundreds of layers to achieve a 3D look. Since After Effects wasn’t made to be a 3D engine, the process is slow and difficult, lacking the real-time speed that most artists use to iterate effectively. With PSD to 3D, a simple conversion makes all of Maya’s tools available in minutes, helping artists animate much faster.
To mark the launch, e.d. films has prepared a short demo (below) demonstrating how artists can start using PSD to 3D on their animated projects today. e.d. films will also be releasing eight new assets into their online store including custom sound bundles, handy scripts, workflow helpers and special assets like sparkles, fog and bugs. These items join a growing list of tools, brushes and animated aids that e.d. films make available after every production.
VFXscience spoke with Daniel Gies, Art + Tech Director at e.d. films:
Who actually came up with this and what is their background?
I came up with the idea and worked directly with a talented programmer, Fabien Raspail, from the Centre de développement et de recherche en imagerie numérique (CDRIN) to realise the plugin.
The plugin and workflow surrounding it came from a need to find a process that mimicked going from Photoshop into After Effects, with the added benefits of real-time 3D interaction and advanced modeling and rigging. During our long history with After Effects we’d developed elaborate workarounds, techniques and methodologies to overcome its limitations and were hitting some significant walls. Our scenes and rigs were getting so complex, slow and cumbersome to work with that we were losing all of the time and cost benefits of working within a limited animation style.
Once we found a way to emulate the results of After Effects scene creation and animation, we needed to come up with a method to make more accessible and less time consuming. Modeling 2.5D assets by tracing polygons on a textured 2D plane was far too slow and tedious.
How does this plugin work out the desired 3D version of the asset?
The “Lite” version of the plugin finds the perimeter of each drawing layer in Photoshop, and then overlays a grid into that. This produces a smooth, even triangulation, which gives predictable results when painting deformation onto the mesh using Maya. The “Pro” version introduces a more advanced technique. The artist can draw their topology, using the Pen tool in Photoshop. By tracing along visual features of the drawing, the artist can obtain a 3D mesh which matches their intentions for the original 2D asset. This technique combines the best tools and benefits of both worlds.
How do the 3D objects then work with Maya?
The 3D objects are built inside of Maya, so they aren’t sitting outside of the program and have all of the flexibility you would expect from a Maya generated mesh. The data used to assemble the mesh lives outside of Maya and is generated in an external process. The settings that pertain to the Maya generation are stored in a JSON file alongside the texture maps. We designed it this way so that we would have the flexibility to generate FBX or OBJ objects in future builds.
How does this differ from the After Effects method?
Our goal with this plugin and its workflow was to emulate all the positives of how we were using Photoshop and After Effects without all of the negatives. The amazing thing about going from Photoshop to After Effects for environments and character animation is that you literally just import your layered PSD file and start positioning or rigging the pieces. I think this is a huge part of its allure, especially for small studios and independent creators. It is very much “What you see is what you get.”
The downside of the easy accessibility is that After Effects is not designed for building Animated Environments or doing character animation. It is pretty good at it, almost by accident and not without the help of some pretty crucial plugins like Duik (for character IK, Rigging and animation tools) and Joysticks and Sliders (for 3D animation style animation controls and behaviours). As the projects get more ambitious and move beyond just a handful of layers and really basic puppet rigs, the limitations of the program quickly begin to show.
Some of the most important tools and workflows that 3D animators are used to, do not exist in After Effects without additional plugins and custom scripts. Not to mention, you have to pre-render your sequence to see the animation in real-time even without effects or lighting enabled. This can be fine if your scene is really basic, but it quickly gets out of hand. We were getting to a point where animating characters and environments in After Effects felt slower than doing stop motion and we had custom code on everything. This is not the case with Maya.
Maya, being a natively 3D animation package for film, is made for very complex environments, robust rigs, and character animation. Scenes that would leave After Effects chugging away for 3-5 seconds per frame play-back in real time. An added bonus is that you aren’t limited to flat planes with images on them, you can do so much more. The downside is that, without our plugin, just to get to the same point where After Effects begins there is a huge learning curve. Before you can start placing artwork in a scene you will have to learn how to Model in Maya, Create UV Maps and make custom materials. We wanted to eliminate those three big steps so that artists could just hit the ground running and focus on layout, sculpting, rigging, lighting and animation. The plugin really helps you get your work from Photoshop into Maya so that you can use After Effects for what it is best at (motion graphics, effects and post-production) and use Maya for what it is best at (3D modeling and Animation).
A big added bonus to all of this is that if you are using Maya for After Effects style, 2.5D animation, and backgrounds, it is far easier to rig, weight, paint, animate, light, simulate and render. With very little experience you get access to some of the best features of Maya like blendshapes, paint effects, XGen, cloth, fluids, and physics; all things we bend over backward to achieve in After Effects. I find that when I use these features on our projects, I don’t usually get into the complex details that are usually required with full 3D productions. I can typically get away with using the most basic settings and usually just use some of the supplied presets.
Quite often, I found that for the amount of time I spent trying to learn a new plugin or attempting to fake something like cloth or dynamics in After Effects, I could have learned how to do it in Maya and the results would be far more scalable.
Tell me about your studio. What kind of work do you primarily do?
We sometimes refer to our studio as a Boutique animation shop on the corner because you can, virtually, look in the windows to see the kind of work we are doing, how we are doing it and take home some of our custom tools and techniques for your own projects.
We specialize in an illustrative, handmade, style of animation and put a large focus on research and development. We are always keeping our eyes open for new ways of doing things that may help us create more ambitious projects without having to scale up too much. We have had a pretty big focus on using game engines in animated film production for the last four years.
Currently we have two animated shorts wrapping up for this year, a large museum exhibit, further tool and asset development for the store and we are hard at work putting everything we have learned about game engine animation into the production of an animated feature.
PSD to 3D is available now in two versions that cater to artists with different levels of 3D experience: PSD to 3D Lite (CA$20) and PSD to 3D Pro (CA$60). Each version is compatible with Photoshop CC 2014–2019 and Maya 2016–2019.
Related links:
